Il est important d'attribuer un nom à chaque poste de travail dans votre magasin afin qu'ils puissent être facilement identifiés sur les rapports, que les options spécifiques aux postes de travail puissent être configurées et que vous puissiez encaisser correctement vos caisses à la fin de la journée.
Créer un nom de poste de travail
- À partir du bureau Ascend, sélectionnez le menu View > Locations.
- Mettez en évidence votre emplacement dans le volet supérieur de l'explorateur de bases de données.
- Dans le volet inférieur, sélectionnez l'icône Ajouter pour créer un nouveau poste de travail pour cet emplacement.

- Dans le champ Name, saisissez le poste de travail souhaité (par exemple Cash Station 4).
- Cliquez sur Enregistrer.
Attribuer un nom de poste de travail à un ordinateur
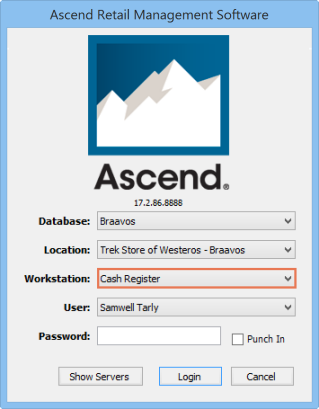
- Depuis le bureau d'Ascend, sélectionnez le menu File > Login.
- Dans le menu déroulant poste de travail, sélectionnez le nouveau nom du poste de travail (par exemple Poste de caisse 4).

- Dans le menu déroulant Utilisateur, sélectionnez votre nom.
- Dans le champ Mot de passe, saisissez votre mot de passe.
- Cliquez sur Login.
Configurer les options du poste de travail
Vous pouvez "verrouiller" un ordinateur, de sorte que le nom du poste de travail ne puisse pas être modifié. Cela permet de s'assurer que les rapports contiennent les bonnes données.
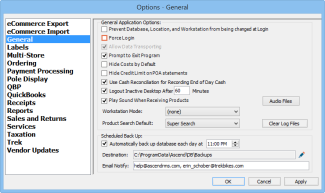
- Depuis le bureau Ascend, cliquez sur l'icône Options.
- Sélectionnez Général à gauche.
- Cochez la case Empêcher la modification de la base de données, de l'emplacement et du poste de travail lors de la connexion.

- Cliquez sur OK.