

After going through the advance preparation for a full-story physical inventory (see Inventory Center - Preparation: Full Store Inventory), you should create an Inventory Event in the Inventory Center a day or two before the big day.
The Ascend Inventory Center makes it easy to prepare in advance for your full store physical inventory. You can easily create an Inventory Event, save it, and re-visit it at a later date or time.
Inventory Events also make it easy to plan out your Cycle Count schedule in advance, since you can easily copy an existing event to create a new one.
Create an Inventory Event
- Start by selecting Inventory Center or Tools > Inventory Center from the Ascend desktop.
- In the Inventory Center Event prompt, you can either
- Create a new Event,
- Clone an existing Event and give it a new name,
- Or select an existing Event.
- Note: Check Include Reconciled Events to select an Event you've already reconciled.
- You can also highlight an existing event here, and click Delete to remove it from the list. Be careful. Once deleted, an Inventory Event can not be restored!
- Select the radio button for Create New Blank Event. Enter an Event name and click Create.

-
Add Sections prompt:
-
Number of Sections: Enter the number of sections you want to create in the inventory event.
- Note: You can add or delete sections at any time after the event is created, so if you don't know the exact number of sections in advance, you can make changes later.
- Starting Number: Enter the section number you are starting with. Section labels are numeric and follow in ascending order.
-
Number of Sections: Enter the number of sections you want to create in the inventory event.
- Click Add.

- The event opens in the Inventory Center.

Connect the Inventory Scanner
If you have a new device or need to reconnect a current device, check out our article, Inventory Scanner - Connect the Inventory Scanner to your Wi-Fi Network
Navigate the Inventory Event screen
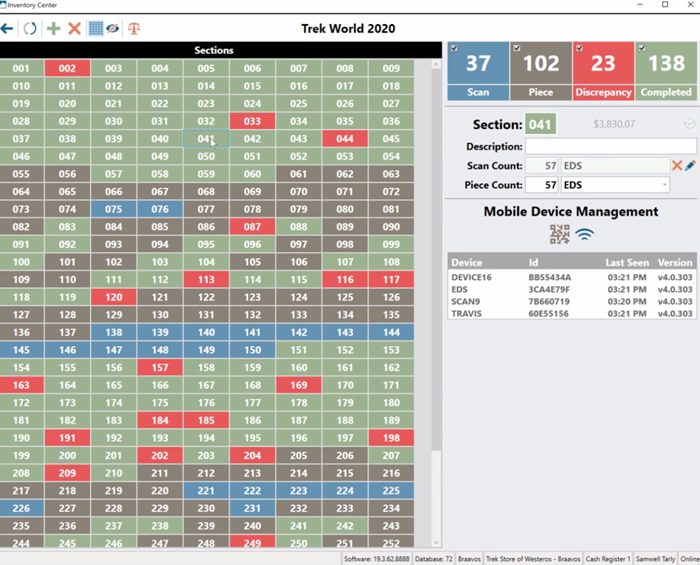
The sections are laid out in the middle of the screen. Click the Grid icon to toggle the view between a simple grid and a more detailed layout that shows the count numbers.
Grid View

Hide
In the detailed layout, you can click the Hide icon to remove the count numbers temporarily.


Remove
Easily select a Section and remove it using the Remove icon up here.

Add
Or add new sections using the Add icon.

Reconcile
The final icon at the top of the screen is Reconcile, which you want to leave alone until your section counts are complete!

Status Markers
Status markers note the number of sections with that status. Each status also has an associated color. The color of the Section in the grid will match the color of its current status.
- Scan: Number of sections to be scanned.
- Piece: Number of sections to be piece/physically counted.
- Discrepancy: Number of sections with a discrepancy between the Scan and Piece count.
- Completed: Number of sections with a match between the Scan and Piece count

If the Piece Count does not match the Scan Count, the tile turns red on the scanner's Scoreboard and in Ascend's Inventory Center, indicating that there is a discrepancy between the two.
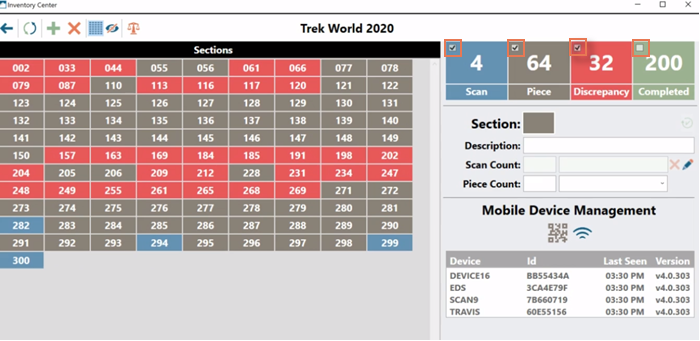
Filter Status Markers
You can also filter this Event over on the right side of the screen. Check or uncheck status boxes to see any combination of:
When you select a Section, its details appear on the right side of the screen:
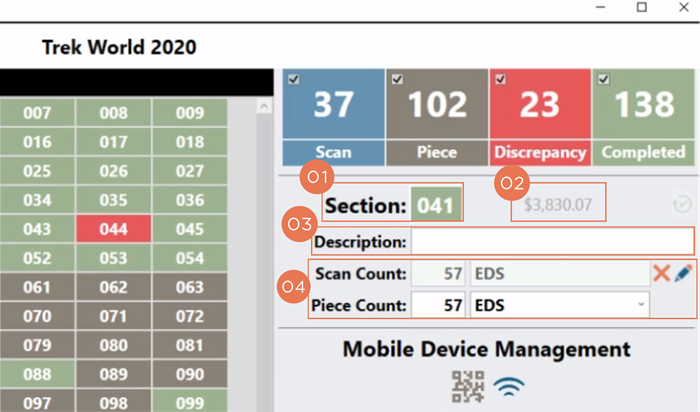
- Section: The section number shows here; you can update this, but will receive an error notification if the new number is already in use.
- Cost: The total Cost of the items scanned in the section shows here and cannot be edited.
- Description: Add a Section Description here. This description also shows on the detailed grid layout.
- Scan Count: The total of items scanned in the section file. Along with the name of the associated scanner, staff member, etc. You can update the Scan Count manually.
- Piece Count: The total of items piece/physically counted in the section. Along with the name of the associated scanner, staff member, etc. You can update the Scan Count manually.
Mobile Device Management
You can update your Wi-Fi network information or connect your inventory scanner here. For more information, check out our article, Inventory Scanner - Connect the Inventory Scanner to your Wi-Fi Network.
Additional Resources
KB22-124