Per registrare un'ispezione in più punti, è necessario inserire un numero di serie all’interno della scheda cliente In questo modo potrete facilmente tenere traccia dell'intera storia della bicicletta nel vostro negozio e, se il vostro cliente riscontrare problemi, potrete facilmente consultare queste informazioni per aiutarlo a risolvere la problematica.
Accedere al modulo
Se il cliente ha già la sua bicicletta in negozio per una riparazione, è sufficiente selezionare (o avviare) il Dettaglio ordine di lavoro e selezionare la scheda Ispezione .
![]()
Anche se il cliente non ha ancora effettuato altri interventi, dovrete comunque registrarlo, ma non è detto che dobbiate creare un ordine di lavoro completo finché il cliente non vi lascia la bici. Nella schermata Centro assistenza è sufficiente fare clic sul pulsante Ispezione della barra degli strumenti: non sarà possibile convertire l'ispezione in un ordine di lavoro, ma sarà prontamente disponibile nella cronologia del cliente.
![]()
Utilizzando il modulo
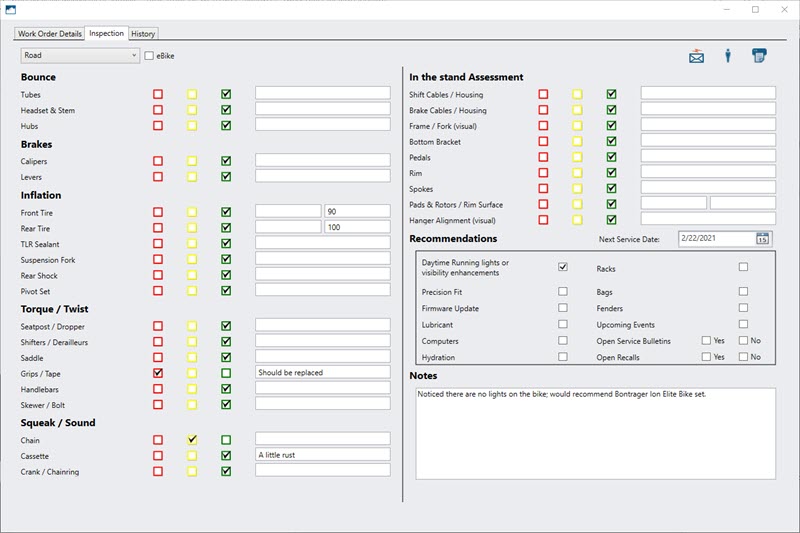
- Nel menu a tendina Categoria selezionare la tipologia di bicicletta da ispezionare.
- Se la bicicletta è elettrica, selezionare eBike.
- Per ogni opzione, selezionare la casella appropriata per indicarne lo stato di manutenzione.
- Rosso: Il componente è in cattive condizioni e richiede attenzione/riparazione/manutenzione immediata.
- Giallo: Il componente è in condizioni accettabili ma richiederà attenzione/riparazione/manutenzione nel prossimo futuro.
- Verde: Il componente è in buone condizioni e probabilmente non richiederà interventi nel breve termine.
- Inserire note/misure aggiuntive accanto a ciascun componente.
- Nel campo Next Service Date inserire o selezionare la data in cui il meccanico consiglia di portare la bici in assistenza.
Nota: Per impostazione predefinita, la data selezionata è sei mesi dalla data di creazione del Dettaglio ordine di lavoro o dell' Ispezione. - Nella sezione Raccomandazioni :
- Potete inserire eventuali componenti aggiuntivi consigliati.
- Se ci sono eventi in negozio che potrebbero interessare al cliente nel prossimo futuro, controllare Prossimi eventi.
- Nel campo Richiami aperti selezionare Sì o No per indicare se il produttore ha emesso dei richiami di prodotto per il modello in oggetto.
- Nel campo Richiami aperti selezionare Sì o No per indicare l'eventuale presenza di richiami aperti emessi dal produttore per il proprio modello.
- Nel campo Note inserire eventuali informazioni aggiuntive.

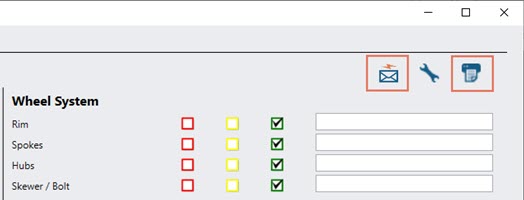
- Fare clic sull'icona email per inviare via email una copia dell’ispezione al cliente.
- Fare clic sull'icona della stampante per stampare una copia fisica dell’ ispezione.

Vista del cliente e vista del meccanico
Naturalmente i clienti sono interessati a vedere cose diverse rispetto ai meccanici, per cui è possibile modificare facilmente l'ordine del modulo in base a chi lo guarda. Per impostazione predefinita, il modulo si apre in Vista Meccanica - è sufficiente fare clic sull'icona Cliente per passare alla vista cliente.
![]()
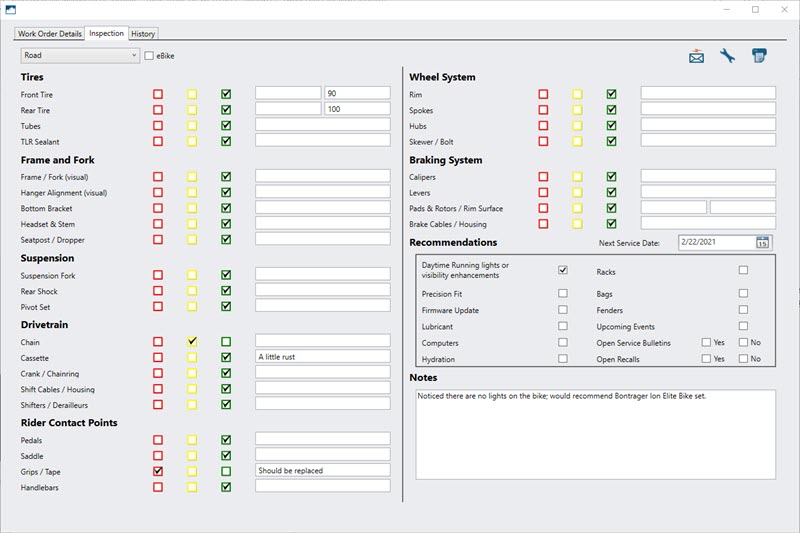
La vista cliente contiene gli stessi elementi (con le note, le caselle di controllo e i commenti), anche se vengono mostrati in modo più comprensibile per il cliente. Il cliente probabilmente sarebbe confuso da una categoria chiamata Rimbalzo o Scricchiolio, ma può capire termini come Pneumatici o Ruote.

Nota
Quando si stampa o si invia per e-mail la checklist, viene sempre utilizzata la "vista cliente".
Fare clic sull'icona della chiave inglese per tornare alla vista meccanico
![]()
Cronologia ispezione
Nella schermata Dettagli ordine di lavoro selezionare la scheda Cronologia . Dal menu a tendina, selezionare la data dell'ispezione - verrà visualizzato il modulo in modalità di sola lettura. Le ispezioni fatte in precedenza, non possono essere modificate, ma se si desidera ottenere maggiori dettagli sull'ordine di lavoro in cui sono state inserite, fare clic sull'icona del codice a barre "per copiare il codice a barre della transazione.
![]()