保証書とは、品目が特定の期間内に破損した場合、
修理または交換することを約束するもので、仕入先から顧客に渡される書面です。
補償の対象となる損害の種類は、保証によって異なる場合があります。
保証を発行した仕入先に直接 保証請求の連絡をする必要があり、
彼らが次のステップ(修理または品物の交換)を決定します。
クレームがメカニック/サービステクニシャンによる作業(商品交換や取り付けなど)を必要とする場合は、
必ずそのためのサービス発注を入力してください。
記事: お客様の修理(ワークオーダー)を処理する
ワランティ該当商品の保証手続きを行う場合、
その商品特有のプロセスがあります。
詳しくはこちらをご覧ください:Trekの保証手続きについて
しかし、保証請求のプロセスにおいてAscendを最新の状態に保つために、
お客様ができるいくつかのステップがあります。
注意 ユーザーは以下のアクセス権限が必要です:
SQLクエリ:ウィンドウでコマンドを許可する
保証該当商品:レポートを実行し、保証のステータスを表示する。
在庫の調整 - 追加: 在庫の調整を作成し、返品保証を在庫から削除します。
顧客が破損した保証該当商品を持ち込んだ場合
- Ascend で返品を作成する。
- レシートをスキャンして返品を選択した後に品目の追加を行うか、
取引画面で品目をスキャン/検索して追加することができます。 - 個の項目の数量がマイナスであることを確認してください。
- アイテムをダブルクリックして編集する。
-
保証欄 にチェックを入れる。
注意: 返品であるため、その品目の数量は(保証状況にかかわらず)在庫に追加されます。 - マネージャーがその品目が修理または再販できないと判断した場合、
在庫の調整を作成し、アイテムは削除できません。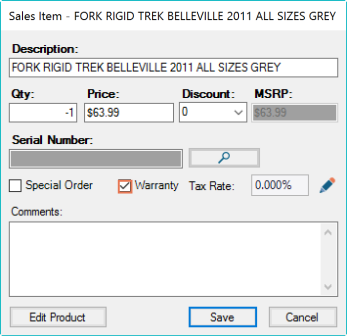
- 保存をクリックします。
- 保証該当商品ウィンドウが開きます。
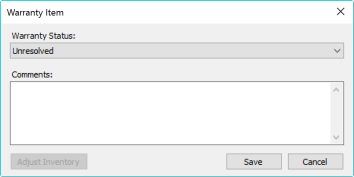
- 必要に応じて状況を更新する。
- 保証の詳細および該当商品の破損状況を入力してください。
- 保存をクリックします。
そして、購入の証拠を保存しておくこと:
- Ascend デスクトップから表示>顧客 を選択します。
- 顧客を検索し、強調する。
- ウィンドウの下部で、履歴タブ を選択する。
- 完了トランザクションフォルダ を展開する。
- 品目が販売済のトランザクションをダブルクリックします。
- レシートを印刷する。
- 印刷アイコン がアクティブであることを確認する。
- トランザクション内では を保存するを選択します。
- またはレシートをファイルに保存します。
- 選択>ファイル> 印刷プレビュー.
- 保存アイコン を選択する。

- 保存する場所を選択し、必要であればファイル名を更新し、Save を選択します。
- また、Eメールアイコン を選択し、顧客にコピーを送信することもできます。
最終的には、この問題を再検討し、解決する必要がある:
- Ascend デスクトップからレポートアイコン を選択します。
- 左側の「保証ワランティ」フォルダ を検索し、展開します。
- 保証該当商品レポート をダブルクリックする。
- フィルターウィンドウ に必要事項を記入する。
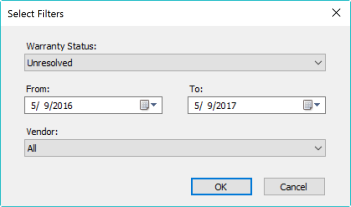
- ドロップダウンメニューから、調査している状況 を選択します。
- 検索するための日付範囲 。
- 必要に応じて、仕入先 を指定する。
- OKをクリックします。
- 結果が表示される。
- 保証該当商品ウィンドウ を編集するには、該当商品をダブルクリックします。
- 必要であれば、その項目の状況 またはコメント を更新する。
- 必要に応じて、在庫の調整ボタン を選択し、ストアの在庫から品目を削除してください。
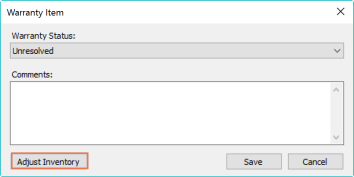
スタッフが破損した保証該当商品を発見した場合
- 作成> 在庫の調整 を Ascend デスクトップから選択します。
- ウインドウ上部の検索バーを使って品目を検索します。
- 必要に応じて、検索結果から品目を選択してください。
- Type ドロップダウンメニュー で、Warranty を選択する。
- アクションドロップダウンメニュー で、減らす を選択する。
- 単位コストフィールド でコストを確認する。
- 数量: フィールド を更新する。
- 品目がシリアル番号登録されている場合は、シリアル番号欄 に記入してください。
- コメント] フィールド に保証問題の説明を入力してください。
- 保存する をクリックして、商品を在庫から削除します。
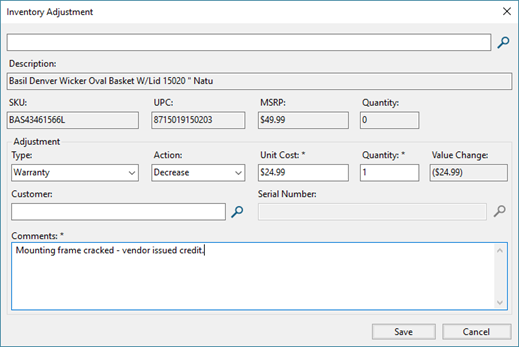
在庫の調整項目は、
Ascendデスクトップから表示>在庫調整 を選択することで、いつでも確認することができます。