
Note: Always search for variations of the customer's name, including misspellings, before adding them.
Getting started
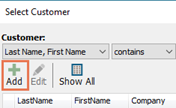
Add from a transaction: From the Select Customer dialog box, click Add (on the toolbar).
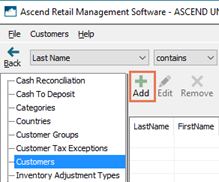
Add outside a transaction: From the Ascend Desktop, click the Customers tile.

Then click Add (on the toolbar).
Customer Record
Customer Record - Easy Button
Click the Scan Drivers License icon (keyboard F7) to scan a customer’s driver’s license with the Zebra/Motorola Driver's License Barcode Scanner (DS4308-DL, DS6878-DL, or DS8178-DL). This will automatically fill in the customer information, as provided by the state, for the fields highlighted in yellow (when you select the icon).
![]()
Customer Record - General
(required) Account Type: Select Individual if the customer is a person, or Company if an organization.
(required) First Name: Enter the customer’s first name (this field is not required if Account Type Company is selected).
(required) Last Name: Enter the customer’s last name (surname) (this field is not required if Account Type Company is selected).
Company: Enter the company name. This field is required if Account Type Company is selected.
Email Address: Enter the customer’s email address.
Phone 1: Enter the customer’s primary telephone number. Select the appropriate Phone Type.
- Home: Phone number is a home (landline) number.
- Mobile: Phone number is a mobile (cell) number which can receive SMS (text) messages. This option is selected by default.
- Work: Phone number is a work number
- Fax: Phone number is a facsimile machine.
- Mobile (No SMS): Phone number is a mobile (cell) number, but which cannot receive SMS (text) messages
- Other: Phone number is another type not defined above.
Phone 2: Enter the customer’s secondary telephone number. Select the appropriate Phone Type. See above for details.
Customer Record - Preferred Contact Method
Select the Star Icon next to the customer's preferred contact method. This method will be selected by default when contacting the customer about Special Orders or Work Orders.

Preferred Language: You can select a customer's preferred language, if needed.
Gender: Select the customer’s gender. This field may be required based on your Options.
Birthday: Enter the date of the customer’s birthday.
Account Number: This field is automatically populated based on your location’s Short Code. Enter a new number if you generate account information outside of Ascend, or click New to automatically generate a new number.
Include in Communications: Check if the customer has agreed to receive marketing emails or mailings.
Hidden: Check to remove the customer from your system.
Customer Record - Remember
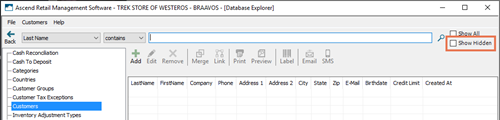
Customer data is not deleted, only hidden. To view Hidden Customers check Show Hidden is selected in Database Explorer > Customers. Transaction data is not affected.
Customer Record - Billing Address
Send Statements: Check if Purchase on Account statements should be generated for the customer.
Address 1: Enter the first line (e.g. street address) of the customer’s billing address.
Address 2: Enter the second line (e.g. unit number) of the customer’s billing address.
City: Enter or select the city for the customer’s billing address. Note: When a ZIP/Postal Code is entered, the matching City and State/Province are automatically selected.
State/Province: Enter the state or province for the customer’s billing address. Note: When a ZIP/Postal Code is entered, the matching City and State/Province are automatically selected.
ZIP/Postal Code: Enter the ZIP or postal code for the customer’s billing address. Note: When a ZIP/Postal Code is entered, the matching City and State/Province are automatically selected.
Country: Select the country for the customer’s billing address. Note: Countries must be activated before they can be selected.
Customer Record - Shipping Address
Address Type: Select Residential if the address is for a home, or Commercial if for a company.
Use Billing Address for Shipping: Check if the Billing and Shipping addresses are the same.
Address 1: Enter the first line (e.g. street address) of the customer’s billing address.
Address 2: Enter the second line (e.g. unit number) of the customer’s billing address.
City: Enter or select the city for the customer’s billing address. Note: When a ZIP/Postal Code is entered, the matching City and State/Province are automatically selected.
State/Province: Enter the state or province for the customer’s billing address. Note: When a ZIP/Postal Code is entered, the matching City and State/Province are automatically selected.
ZIP/Postal Code: Enter the ZIP or postal code for the customer’s billing address. Note: When a ZIP/Postal Code is entered, the matching City and State/Province are automatically selected.
Country: Select the country for the customer’s billing address. Note: Countries must be activated before they can be selected.
Customer Record - Tax

Current Rate: The current tax rate being charged to the customer displays in the Tax header.
Tax ID: Enter the ID provided to prove the tax exception.
Tax Exception Reason: Select the applicable exception reason (e.g. State Park).
- Note: Exception reasons must be added before they can be selected; see Add a Tax Exception Reason.
Tax Rate Detail: The Default Tax and the current Customer Tax rates display in the grid.
- Note: To change the Default Tax and add an exception, click into the Customer Tax field and enter the appropriate rate.
Customer Record - Purchase on Account
Status: Select the status of the customer’s account.
- Inactive: The customer does not have Purchase on Account privileges.
- Active: The customer can charge against a Purchase on Account balance.
- Suspended: The customer has had Purchase on Account privileges, but they are currently unable to use them (e.g. account is in arrears).
- Closed: The customer previously had Purchase on Account privileges, but they have since been revoked.
Credit Limit: Enter the maximum amount the customer may charge.
Terms: Enter the payment terms for the customer’s account (e.g. Net 30).
Require Purchase Order Number: Check if a purchase order number must be entered when charging to the account.
Special Instructions: Enter any additional comments about the customer’s account.
Customer Record - Other Details
Notes
History
Serial Numbers
Groups
MPIs
Customer Record - Modify/update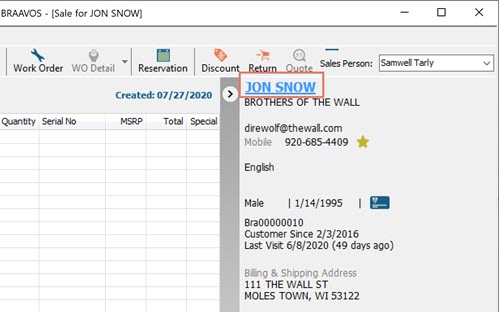
Edit from a transaction: Double-click the customer's name on the right side of the screen in the Transaction Screen.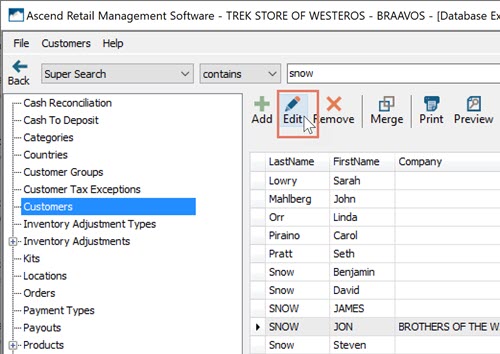
Add outside a transaction: From the Ascend Desktop, click the Customers tile.

Search for the customer using the search bar. Then highlight the customer in the results and click Edit (on the toolbar).
Additional Resources
KB22-013