
Ordering Trek products? Try the Receiving Wizard to make ordering a breeze (more information: Check in multiple Trek orders with the Receiving Wizard). For all other orders, proceed below.
Receive Vendor Orders
Select the Receive icon or View > Vendor Orders from the Ascend desktop to open the Orders window in Database Explorer. Double-click to open the order you are receiving.
If the Order Status is Submitted, Ascend will automatically place the order into receiving mode when you open it up. If the status is Unsubmitted, the order is pending and you can still add items to the order.

You can see if the Order is in receiving mode by looking at the Receiving checkbox on the right. When this box is checked, items that are scanned in or entered in the search bar are marked as received. When this box is unchecked, they are added to the order.

You can also check the Scan Serial Numbers box if you want to be prompted to scan the serial number immediately after receiving a serialized item.
Verify Costs vs. Pack Slip
Comparing the costs on your Purchase Order with the vendor’s packing slip is an excellent method to prevent receiving errors. There might have been an extra discount applied to the products, or the vendor could have updated the product costs after the order was placed.

An easy way to verify is by comparing the Total Order Items and Order Subtotal with the packing slip. If the entire order was shipped, these should match. If they don’t, you’ll need to review the costs and make any necessary adjustments.
A quick way to help make any cost updates is to make sure the In-Cell editing icon is active. This will allow you to click right into Cost field to make updates.


Before You Begin Scanning
Before you begin scanning make sure you have marked products for transfer and all items have been split.
Ascend best practice recommendation is to scan every single item when receiving an order. Scanning each item verifies you will receive the correct amount into inventory and that the barcode can be scanned and recognized by Ascend.
Split All Items/Products

If you are a multi-store retailer, you will want to make sure you have your transfers set before moving on to Split the order. The next steps will walk through Using the Transfer To column.
When you Split All Items it separates each item with a quantity greater than one onto its own line to insure accuracy.

Split All Serialized Items
Split All Serialized Items is used to separate products in a serialized category onto individual lines. First, scan the product being received, then scan the serial number. Assigning the serial number at time of receiving is considered a best practice in Ascend.
Use the Transfer To column
Make sure the In-Cell editing icon is active.

Multi-store retailers can quickly mark items for transfer without leaving the receiving window by using the Transfer To column.
Select the dropdown arrow in the Transfer To column for your item. Next, choose the location the item should be sent to.

If you accidently select the wrong one or need to clear this field, just select the field and hit Backspace or Delete on your keyboard.
When Transfer To items are received they will appear in the Check Out Transfers screen. The items are marked at Picked but are not automatically Sent to the selected location.
Scanning Items to be Received
Place our cursor back in the search box before you begin scanning.
![]()
As you scan each item the blue bar will move to the specific item and a checkmark will be added in the Rec'd column.

Any item that has a checkmark in the Rec'd column will receive that item into inventory when Save and/or Apply are selected in the toolbar.
Scanning Serialized Items
Ascend best practice is to serialize items at time of receiving. This allows for a second verification at time of build and final verification at time of sale. You can also scan the serial numbers for products as part of a Cycle Count and/or Full Store Inventory.
To scan serial numbers as time of receiving, verify the Scan Serial Number box is checked in the order screen.

When Scan Serial Numbers is checked, after you scan the item barcode, the Enter Serial Number prompt will display.

If the item has a barcode that can be scanned to capture the serial number you can scan that at this time or you can manually type it in.
You will see the serial number display in the order screen.
![]()
Special Orders
Keep an eye out for Special Orders. You will see a Customer name and Transaction type in the designated columns.

If you only see a colored box in the transaction column, check out our article, Selling Products From Existing Backorders - On the Vendor/Supplier Order for more details.

Printing Special Order Receipts
Once Special Order items have been checked to be received, you can print receipts for those Special Order items.
Printing Special Order receipts is recommended as a best practice to ensures the product is delivered to the correct customer and/or department.
From the order screen click File > Print Special Order Receipts > Select appropriate option
- Print Special Order Receipts - All: Prints a receipt copy for ALL special orders associated with the order, regardless of receiving status.
- Print Special Order Receipts - Received Today: Prints only receipt copies for special orders received today.
- Print Special Order Receipts - Received This Session: Prints only receipt copies for special orders received in this session.

Printing Labels
Product Labels
- Print Barcode Label - Selected: Print a label for one item selected/highlighted in the order.
- Print Barcode Labels - Received Today: Prints labels for all items received today.
- Print Labels - Received this Session: Prints labels for items received this session.
-
Print Barcode Labels - Received All: Prints labels for ALL received items on the order.
- Note: This option does not factor in day, it will print labels for ALL received items regardless of date received.

Serial Number Labels
For items in serializaed categories you can
- Print Serial Number Label - Selected: Print a serial number label for one item selected/highlighted in the order.
- Print Serial Numbers - Received Today: Prints serial number labels for all items received today.
- Print Serial Number Labels - All: Prints serial number labels for all items received on the order.

Save the order
Once you’ve finished scanning all items to be received on this or or this session, select Save or Apply to add those items to inventory.

What is the difference between clicking Save and Apply?
- Clicking Save will add the items to inventory and finalize the order or receiving session.
- Clicking Apply will add the items to inventory while keeping you on the order screen.
Categorize Products
If any of the items you received haven’t been categorized yet, you’ll be taken to the Category Mapper. You can select uncategorized products from here and quickly map them to the category they should be a part of by highlighting the desired category, and clicking Map.
Note: Best practice recommendation is to categorize products at time of order creation to help move the receiving process along. It also ensure serialized items are categorized properly and can be serialized at time for receiving.

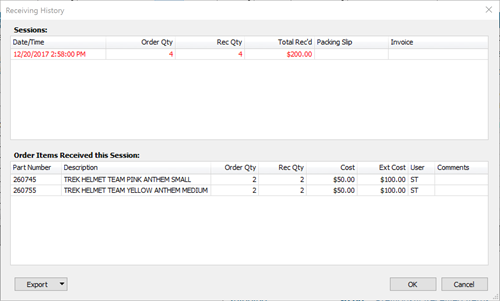
Once you’re done, the Category Mapper closes and the Receiving History window opens.
Receiving History
This shows you the details of the order, including items received and the initials of the employee who received them. Enter your Packing Slip and Invoice information here. Then select Okay.
Ascend Best Practice: We recommend entering the Invoice once it has been paid. This is the checks and balance process to know what has and has not been paid. Use the Ascend Client report: Orders Receive by Session (Ascend > Reports > Inventory > Orders Received by Session) to verify and enter Invoice information.
After entering information in the Receiving History, you may be prompted to contact the customer the items are for.
Contacting Special Order Customers

When Special Order items are received, you will first receive a prompt to ask how you'd like to notify the customer and then the ability to send those notifications (they do not automatically send).
You can see the transaction type in Orange and then the Customer Name in blue and who on your staff requested the item be special ordered.
The Please select notification options below allows you to notify the Customer and/or Requester for Layaways and Customer, Requester, and/or Technician for Work Orders.
You will see a star if the customer has a preferred method of communication marked in their Customer Record.
Click OK to generate the Email and/or SMS (text message).


If you'd like to learn more about setting up SMS (text), check out our article, Settings - SMS (text) Integration. Or for setting up email, check out our article, Settings - Email Integration.
Shipping
Lastly, you’ll receive a shipping prompt. You can add the cost of shipping for this order, and even divide it among the items, if you’d like.

Note: Applying shipping charges to order item costs affects your COGS and Margin. Shipping costs will be split across the received items with a weighted average with higher cost order items getting a higher percentage of the shipping cost.
Discuss the handling of freight charges in Ascend with your bookkeeper. (QuickBooks users) If you've assigned an account to Shipping Charges (in Options > QuickBooks), shipping charges cannot be split.
If needed, check the Update Vendor Cost box to update the Cost on the Vendor Product record(s) for all item(s) received on this order.
After all items are received and the order is saved, the Order Status will change to “Received” and the order will no longer appear on the list of Active Orders.
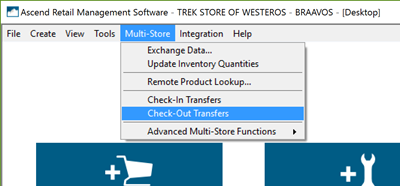
Transfer items
If you marked any items for transfer, those products now appear in your Multi-store > Check-Out Transfers screen and are ready for the next step in the transfer process.
KB22-114