
Helpjuice Info Callout Title
Can I import sales from Locally and WorkStand at the same time?
Yes, you must have the information for both filled out individually in Options > eCommerce Import. For more information, please check out our article, eCommerce - Set up Ascend to Import eCommerce Sales.
Importing your eCommerce sales from your website into Ascend provides the following benefits:
- Monitor your online inventory and sales from Ascend.
- Eliminate the need to manually enter eCommerce transactions into Ascend.
- Be alerted when new eCommerce sales are available for download.
- Ensure that online sales are fulfilled promptly.
- Optimize business efficiency.
Important: If you use Locally, customer orders must be acknowledged (accepted or rejected) within four business hours based on your hours of operation configured for Locally. If an order is not accepted or rejected by a team member within four business hours, the order will be automatically cancelled and your account will be charged a 3.5% auto-cancellation fee by Locally.
Download eCommerce sales to Ascend
- When a new eCommerce order is available for import:
- The eCommerce tile on the Desktop displays the total number of orders which require action.
- To access new orders:
- Click the eCommerce tile.
- All open eCommerce orders will be displayed.
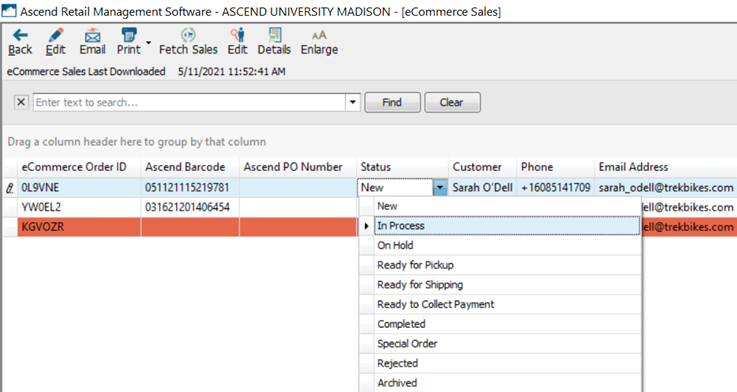
eCommerce Transaction Statuses
New
If the Customer and all Product information matches, a transaction for the order is automatically created and all products are removed from inventory.

Statuses That Require Additional Actions
When one of these statuses appears, no transaction has been created, and products remain in your inventory.
Customer ID Needed
The Customer could not be matched with a customer in your local Ascend database. We always recommend doing one more search before adding a new customer to your database.
- Select the Locally order.
- Click Identify in the top toolbar.
- In the Customer Search, search results that match the customer's First and Last Name automatically display.
- Select the correct customer from your database and click Select.
- If the correct customer is not in your database, click Create to create a new customer. Article: Customers - Create a Customer
- Continue with processing the order.
How are customer's automatically matched?
Customer's are automatically matched based on:
- The email address the customer entered on your website matches an email address entered in your Ascend database.
- The customer has previously been matched on an eCommerce sale.
- If a customer’s information requires an update, their record must be manually edited.
How do I manually update the customer record from the eCommerce screen?
- Highlight the customer you would like to edit.
- Click Edit in the top toolbar.

Note: If a customer consents to receiving mailings in their Locally order (see the Locally knowledge base for more information), check Include in Communications on the customer record (see Customers - Create a Customer).
Product Match Failed
An eCommerce item matches multiple Ascend product or the item cannot be automatically recognized by Ascend.
The Locally UPC and Part Number MUST be an EXACT match to the Ascend product's UPC and VPN (Vendor Part Number).
- Log into Locally to obtain additional information on the product record that is failing.
- From Ascend > Database Explorer > Products search for the product.
- If the product is found, open the product record to determine why it does not match Locally.
- If the product is not found, you will need to manually add it.
- Article: Products - Add or Edit
- Return to the eCommerce orders screen.
- Select Process Sale from the Status dropdown.
- Click Save in the bottom righthand corner.
- Once the Product Match Failed status is cleared, the transaction is created for the order.
How are Products automatically matched?
Ascend automatically matches the eCommerce product if the Locally UPC and Part Number match exactly to the product's UPC and VPN in Ascend.
How do I avoid the product match fail error?
- Ensure the Locally UPC and Part Number is an EXACT match to the Ascend product's UPC and VPN (Vendor Part Number).
- Be sure you are setting up products correctly between Ascend and Locally,
- Stay up-to-date on your Ascend vendor/supplier updates through the Cloud Catalog and Imports.
- Clean up Duplicate Products.
- Tools > Advanced Database Functions > Remove Duplicate In-Store Products
Process a Locally Order
Locally allows you to offer your customers the option to either buy (pay in full) or reserve (no payment required) products online and pick them up in the store.
- The eCommerce Sales screen can be filtered and further customized for easier use.
- Orders are automatically removed from this screen when their Status is Completed or Archived.
- Do not modify the price of eCommerce sales items without contacting the customer.
- If an issue exists with fulfilling the customer's sale, call the customer or utilize the Email button on the toolbar.
Cancel Locally Order
If a product is sold out in the store before an online order has been filled, the order can be cancelled so the customer isn’t charged for the item.
- Click the eCommerce tile on the Ascend desktop.

- On the eCommerce Sales screen.
- Select Rejected in the Status column.
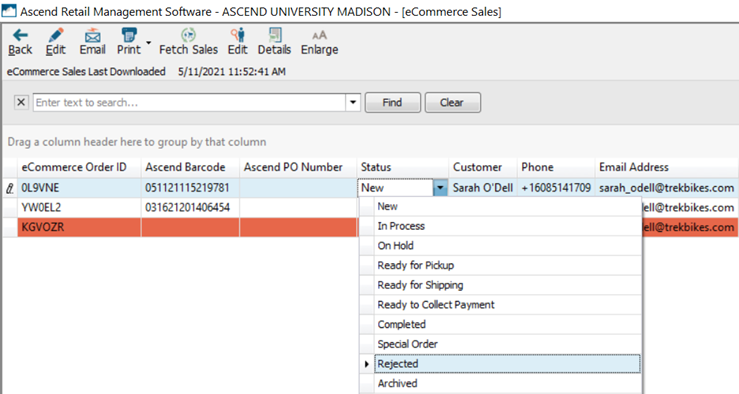
- Click Save in the bottom righthand corner.
- Double-click the order to open the transaction.
- Remove all sale items.
- In the Transaction Comments field, make a note that order was cancelled (e.g. Order cancelled - item sold out before customer order could be processed.)
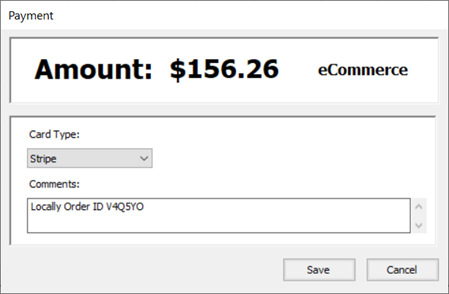
- In the Payments toolbar, click the eCommerce payment.
- Note: If you have a large number of payment types, you may need to click the >> button to view more types.

- In the Payment dialog box, select Stripe from the Card Type dropdown and click the Save button.
- Note: Record a $0.00 eCommerce payment to aid in later reporting.
- If the customer paid online, Locally only places a hold on the card used for payment until the order is processed – when an order is cancelled, the hold is automatically released. However, it’s up to the customer’s bank/card issuer to honor this release and may take up to two weeks to remove the pending hold.
- Click Save.
- On the eCommerce Sales screen, select Completed from the Status dropdown.
- Click Save (bottom right corner of eCommerce Sales screen).

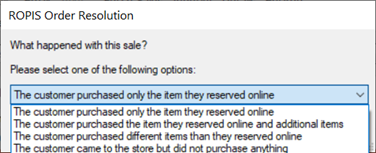
- If the customer reserved the product (no payment), the ROPIS Order Resolution prompt displays – select the appropriate choice and click the OK button.

Purchases (Buy Online)
When the order is available for import:
- Verify payment on Locally.
- Click the eCommerce tile on the Ascend desktop.
- On the eCommerce Sales screen.
- From the Status dropdown, select In Process
- Click the Save button (at the bottom of the screen).
- Note: Customers are notified as soon as the order is accepted – if pickup will be delayed (e.g. a bike order that needs to be built), contact the customer immediately to let them know when the item is expected to be ready.
- Note: Customers are notified as soon as the order is accepted – if pickup will be delayed (e.g. a bike order that needs to be built), contact the customer immediately to let them know when the item is expected to be ready.
- Double-click the order to open the transaction.
- On the transaction toolbar, click the Keep Open button.
- Note: Do not finish (close) the transaction until the customer picks up their order.

- In the Payments toolbar, click the eCommerce payment.
- Note: If you have a large number of payment types, you may need to click the >> button to view more types. If you accept other payment types online, select the custom payment type you created for this type.
- In the Payment dialog box, select Stripe from the Card Type dropdown.
- Note: (US/Canada only) Locally collects and pays local sales tax(es) on your behalf. Sales tax is not included in Ascend transactions.
- In the Comments field, enter any additional information (e.g. approval number).
- Click Save.
- Select the Tools menu > Print Locally Receipt.
- Note: The Locally receipt displays tax and payment information for the customer’s reference.
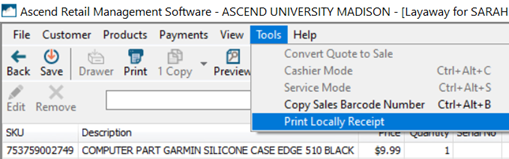
- Note: The Locally receipt displays tax and payment information for the customer’s reference.
- Print a transaction receipt and attach it and the Locally receipt to the order items and move them to your designated special order/layaway area.
- On the eCommerce Sales screen, select Ready for Pickup from the Status dropdown
- Click the Save button (at the bottom of the screen).
When the customer comes to pick up their order:
- From the Ascend Desktop, select the View > eCommerce Sales or click eCommerce tile from the Ascend desktop.
- Double-click the order to open the transaction.
- In the Transaction Comments field, enter a note with the date the customer picked up their order.
- Click the Save button (upper left-hand corner).
- On the Complete Special Orders prompt, click Yes.
- On the Paid in Full Transaction prompt, click Finish as a Sale.
- The transaction is finished (closed) as a sale.
- On the eCommerce Sales screen, select Completed from the Status dropdown.
- Click the Save button (at the bottom of the screen).
Reservations (No Payment Made)
When the order is available for import:
- Click the eCommerce tile on the Ascend desktop.
- On the eCommerce Sales screen, from the Status dropdown select In Process
- Click the Save button (at the bottom of the screen).
- Note: Customers are notified as soon as the order is accepted – if pickup will be delayed (e.g. a bike order that needs to be built), contact the customer immediately to let them know when the item is expected to be ready.

- Note: Customers are notified as soon as the order is accepted – if pickup will be delayed (e.g. a bike order that needs to be built), contact the customer immediately to let them know when the item is expected to be ready.
- Double-click the order to open the transaction.
- On the transaction toolbar, click the Keep Open button.
- Note: Do not finish (close) the transaction until the customer picks up their order.
- Print a transaction receipt and attach it to the order items and move them to your designated special order/layaway area.
- Print a receipt and attach to the order items and move them to your designated special order/layaway area.
- Click Save in the transaction screen.
- On the eCommerce Sales screen, select Ready for Pickup from the Status dropdown.
- Click Save (bottom right corner of eCommerce Sales screen).
When the customer comes to pick up their order:
- From the Ascend Desktop > View > eCommerce Sales.
- Double-click the order to open the transaction.
- In the Comments field, enter a note with the date the customer picked up their order.
- Process the customer’s payment as normal.
- Click the Save button (upper left-hand corner).
- On the Paid in Full Transaction prompt, click Finish as a Sale button.
- The transaction is finished (closed) as a sale.
- On the eCommerce Sales screen, select Completed from the Status dropdown.
- The ROPIS Order Resolution prompt displays – select the appropriate choice and click the OK button.
KB25-031